User Tools
This is an old revision of the document!
Table of Contents
DRAFT
Words of Wisdom: “With a few basic design considerations, and an alternator design newer than 25 years old, a direct charging system [for LiFePO4] can be safe, effective, and provide significant benefits. - midwestdrifter1)
Isolator charging LiFePO4 banks
There is an often-repeated claim that LiFePO4 house banks will pull always monstrous levels of current and destroy alternators if a plain isolator is used instead of a DC-DC charger. This claim is not supported by empirical testing. The data below provide actual measurements to help people make informed decisions. We will see that current demand by LFP banks follows a known formula rather than the opinions of people on the internet.
Short digression: there is a related claim that LiFePO4 cannot be charged fully by isolator. Maybe, but…
- LFP does not need to be fully charged the way lead does.
- LFP will charge quickly to 100% at voltages as low as 13.8v, and most alternators put out more than that.2)
- if solar is present it will also “top off” the lithium if that is something the owner wants to do
- overcharging (holding Vabs after reaching 100% SoC) is actually a bigger concern, particularly if one drives for hours. A manual switch on the isolator (D+ for solenoids, on the ground wire for VSR) will allow the owner to disable alternator charging at will.
So this article will focus on current demand by LiFePO4 house banks.
the formula in 60 seconds
This won't hurt a bit.
I=V/R. This means “current3) is equal to the difference in voltage4) divided by resistance5)”.
For us, this means there are two factors that dictate what a battery bank (lithium or otherwise) will demand of the alternator:
- The voltage difference between alternator and battery bank6) – so the lower the battery's voltage the higher the current demanded.
- the total resistance of the entire circuit7) - wire gauge, length of wiring run, components installed in the circuit, battery chemistry and capacity, etc will make a difference
You don't have to fully understand it or get a I=V/R tattoo, but do keep the basic idea in mind as we plunge ahead.
analysis of van-relevant installs
This section includes installs that one might find in a typical van:
- banks between 100Ah and 300Ah
- single-alternator systems (no dual-alternator setups)
- standard regulators (no external regulators, internal regulator hacks, etc)
- with rated capacities ≥120A8)
Since it includes screenshots the data will be for installs documented before Sept 15, 2022.
{There is a full list including installs that fall outside the criteria above. It is updated as I find new information – secessus}
current drawn expressed as C-rate
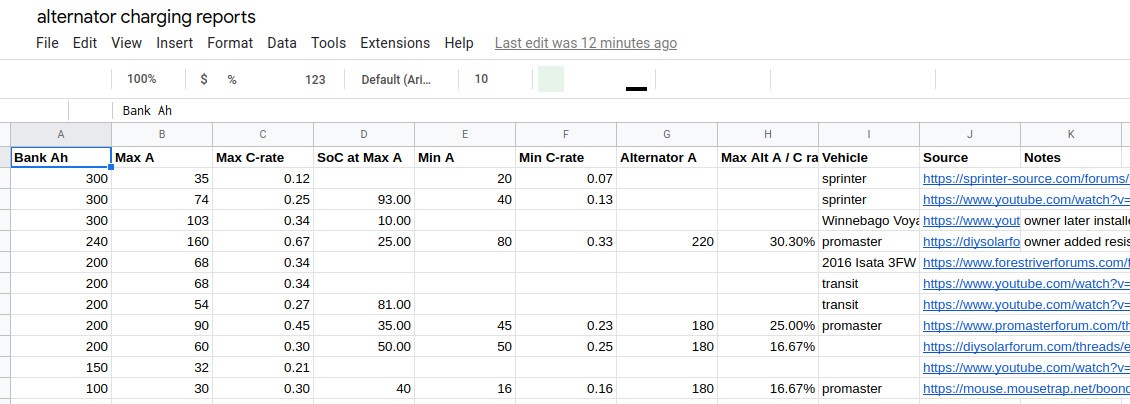
The first thing to look at is how much maximum current the banks are actually drawing in relation to their C-rate (capacity rating).
Remember the warnings tell us the C-rate will be 1.0, which is the max the BMS will allow under most circumstances.
The average max current drawn from the alternator is 0.33C, or 1/3rd of what the warnings predict. This the same C-rate that AGM pulls when cycled to 50% DoD.
There is an outlier that pulls 0.67C at ~10% state of charge.9) That setup has 1awg cables from the chassis to house battery bank, resulting in extremely low resistance (9mR). The practical effect of resistance on current will be addressed below, using that owner's experiments for illustration.
current drawn expressed as percentage of alternator rating
A second way to look at this is how much of an alternator's output the bank draw per 100Ah of capacity:
On average, direct-charging each 100Ah of LFP consumed ~22% of the alternator's rated output.
failures
There are two failures, and neither of them come from the van-relevant section.
Mortons on the Move
500Ah of LFP direct charged with a 225A alternator. This falls outside the van-relevant window since bank size >300Ah.
Mortons on the Move were able to overheat (not damage) the 225A primary alternator with 500Ah pulling 180A between the tow vehicle and travel trailer. This setup might have worked with the theoretical ~400A capacity of the dual-alternator system, but the second alt was not cutting in the way they expected. They ended up installing a DC-DC charger (30A Orion-TR) to limit current.
Victron video
300Ah of LFP (no BMS) direct charged with a 90A alternator. This falls outside the van-relevant window since alternator rating <120A.
Victron damaged a 90A car alternator with 300A of lithium on a bench (no airflow as when driving). They were able to charge the same bank from a 100A-120A10) externally-regulated Balmar alternator. The Balmar observes alternator temperature and regulates current to maintain alternator-safe conditions.
lessons
Think twice about direct-charging banks that have 2-3x the capacity of your alternator's rating. Use a DC-DC charger, external regulation, or current reduction with resistance as described elsewhere in this article.
Do not idle to charge.
tweaking current with resistance
The owner of the van in the higher-current outlier mentioned above had very low resistance in his wiring. He added resistance to see the practical effect on current drawn by the house bank:11)
We can see that adding resistance makes a noticeable difference in the charge current flowing from alternator to bank.
 Thinking back to I=V/R, we should not be surprised that tripling R reduced current to 1/3rd of it's unfettered rate. He provided additional datapoints (table to right).
Although he inserted an actual resistor, any component that increases resistance would have a similar effect:
- battery monitor shunts
- fuses
- connecting to positive bus rather than battery POS terminal
- Sizing wire to noncritical spec tends to level out the charging current; high current causes voltage sag, which reduces current.12) For a 14.4v alternator 10% sag means the battery would see 13.0v and at 3% sag it would see 13.97v.
- etc
application
Let's assume battery resting voltage is 13.0 and alternator voltage is 14.0 and circuit resistance is 20m Ohm.
- I=V/R = (14v-13v)/0.020m Ohm = 1v/0.020m Ohm = 50A
Let's add 5m Ohm of resistance:
- I=V/R = (14v-13v)/0.025m Ohm = 1v/0.025m Ohm = 40A
tweaking current with voltage
Diode-based isolators incur voltage losses, averaging around 0.5v. This will decrease the difference between battery and apparent alternator voltages, thereby reducing charging current.
It would also reduce final charging voltages, so this might allow vehicles with high chassis voltages like to safely charge LFP. Example: 14.6v → diode-based isolator → 14.1v.
application
Let's assume battery resting voltage is 13.0 and alternator voltage is 14.0 and circuit resistance is 20m Ohm. Diode isolator cause 0.4v loss. We'll do it with a relay first:
- I=V/R = (14v-13v)/0.020m Ohm = 1v/0.020m Ohm = 50A
Let's add the diode isolator13) to reduce apparent alternator voltage:
- I=V/R = (13.6v-13v)/0.020m Ohm = 0.6v/0.005m Ohm = 30A
current demands of DC-DC chargers vs isolators
[For this section we will stipulate that alternator voltage is 14.0v and 60A DC-DC's charging setpoint is 14.4v and float is 13.4v. The bank will accept 85A if directly connected to the alternator at low state of charge.]
Charging a 100Ah bank from 20% 100% SoC would take 80Ah. Direct-charging and DC-DC both deliver the same 80Ah over time but in different ways:
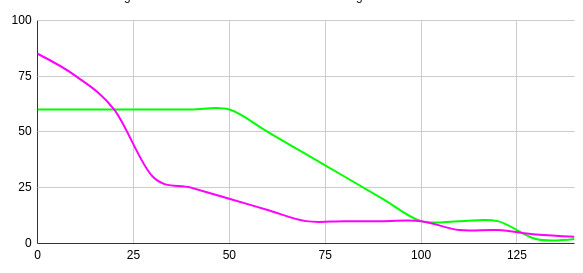
This crude and fictional graph illustrates the general patterns of current demand on the alternator from both isolators (purple) and DC-DC chargers (green).
The isolator starts out high at 85A and current starts falling off immediately. It continues dropping gradually as battery bank voltage comes up to 14.0v at about 30 minutes.14) Current continues to drop but voltage is held at 14.0v unless the isolator is disabled.15)
The DC-DC holds a steady 60A until the 14.4v setpoint is reached around 50 minutes. Current drops off steadily until Absorption durations times out at 100 minutes.16). DC-DC drops to float 13.4v and current tapers away.
breakeven
Note: the crossover point between green and purple at ~20mins marks the time DC-DC charging passes more current than the isolator. By about 35mins the approaches are at breakeven, both having returned about the same Ah to the bank. DC-DC charging voltage might or might not have climbed higher. If one drives for longer periods the advantage may be with DC-DC. If one makes short drives <35mins the isolator might win.
isolator charging outside the knees
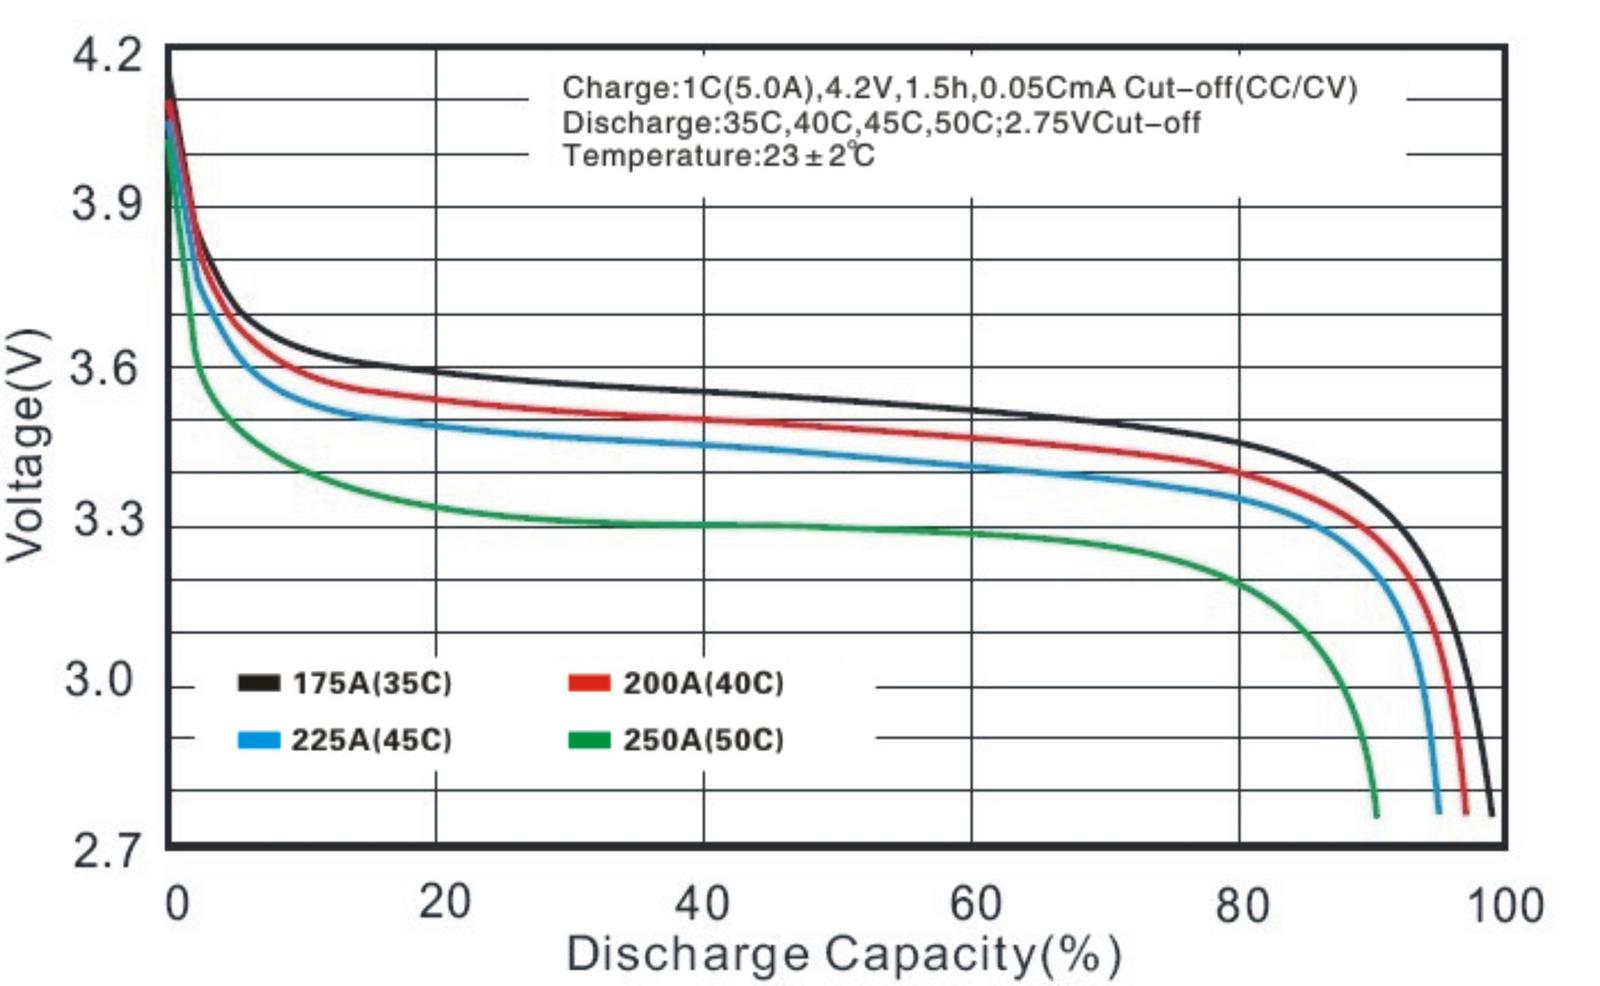
 Lead batteries have linear voltage curves. Lithium has a relatively flat curve in the middle 80% and dramatic “knees” at either end (see graph at right).
- at very low states of charge (<10% state of charge) voltage will be very low, around 12.0v. This means current demanded will be maximal17), then quickly drop off as voltage comes up into the flat middle.
- in the middle 80% voltage will be stable, in the 13.2v - 13.6v range. Charging current will be moderate and stable.
- at high states of charge (>90% state of charge) voltage will climb above 14.0v. Current demand will be very low and remaining charging will be slow. This gives ample opportunity to shut off the isolator manually.
assessing your own setup for direct alternator charging
There are good reasons not to attempt direct charging:
- you already own a DC-DC
- you need consistent, predictable charging, like 40A over the next hour. DC-DC will provide this18); isolator charging starts out high and drops linearly. You might learn its behavior over time, but it will never be as easy as “40A for 1.5 hours = 60Ah”.
- you don't want to think about the battery. DC-DC will either stop charging (Renogy) or drop to float (all others) when charging is complete. Isolators need to be switched off after charging, if you are driving long enough to fully charge the bank.
- choosing wiring can require some effort
- with DC-DC chargers wire sizing is straightforward: charger output rating + 20% to account for DC-DC conversion overhead
- if isolator wiring is already present from a previous bank, test it while using a monitor or BMS info to watch actual current. You may want to decrease fusing to equal the actual wire rating19) during testing.
- if starting from scratch there is less to go on.
- In the van-relevant examples above LFP banks typically pull 0.33C, or 33A per 100Ah of capacity.
- LFP manufacturers typically allow up to 0.5C charging for normal use. One might
If you are still interested, here is one approach to assessing your setup for direct charging lithium:
- if the isolator is already in use with lead-chemistry banks before the upgrade, pay attention to the voltage and current at which the existing bank is being charged. This is your baseline for alternator charging. Ah-for-Ah lithium might draw more current than lead, but Li banks are typically lower in Ah than the lead banks they replace as DoD can be lower.20)
- Read and understand your Li battery manufacturer's charging specs - undercharging is fine21); overcharging is less so but is relatively rare in an isolator context.
- Read and understand your alternator's specs
- Read and understand your isolator's specs and functionality
- observe your vehicle's chassis voltage during normal operation - note that the voltage at the battery's location will likely be lower due to long wiring and also lower when the wiring is carrying a hefty charging current.
- make a first approximation about the ability of alternator, your isolator, and your Li battery to cooperate. Refer to the actual reports in the spreadsheet to see if any approximate your setup. If you can measure the total resistance do so and work the formula.
- install a battery monitor so you can observe current and voltage at the battery. Or use the battery's own BT access.
- ensure the fuse between your chassis and battery bank is sized so you cannot draw more than the alternator and wiring can handle
- test it with a drive.
- repeat the last two steps with the Li bank at lower and lower states of charge, down to the lowest expected state of charge you expect to recharge from alternator.
- disconnect the isolator with a switch when you come to the desired SoC
Caveats:
- Only alternator charge while driving (no idling except for brief preliminary test).
- Pay attention while charging from alternator to keep from overcharging the Li or holding for long periods at high states of charge. You may want a manual disconnect or HVD to shut off alternator charging due to excess voltage or if the bank is already charged. These can be added on the D+ wire (ignition triggered) or electronics ground wire (VSR, solenoid, or voltage-triggered DC-DC)
- Fuse the wiring from the chassis so the bank cannot pull more than you specify
- if current is higher than you want consider adding resistance to the circuit
the parts list
After you have completed the assessment above here are the required parts:
- continuous duty relay,
- a good solenoid like Cole-Hersee or similar. $30
- or VSR like Battery Doctor, $65
- or diode/FET-based isolator if one wants to reduce current further, $7024)
- toggle switch to deactivate relay at will, $5
- optional: high voltage disconnect to automagically disable the isolator at 14.0v-14.2c (whatever your desired charging setpoint is), $15. You can do this with the manual switch above if you are diligent. Also not needed if the alternator's native voltage is <14.2v or so


